
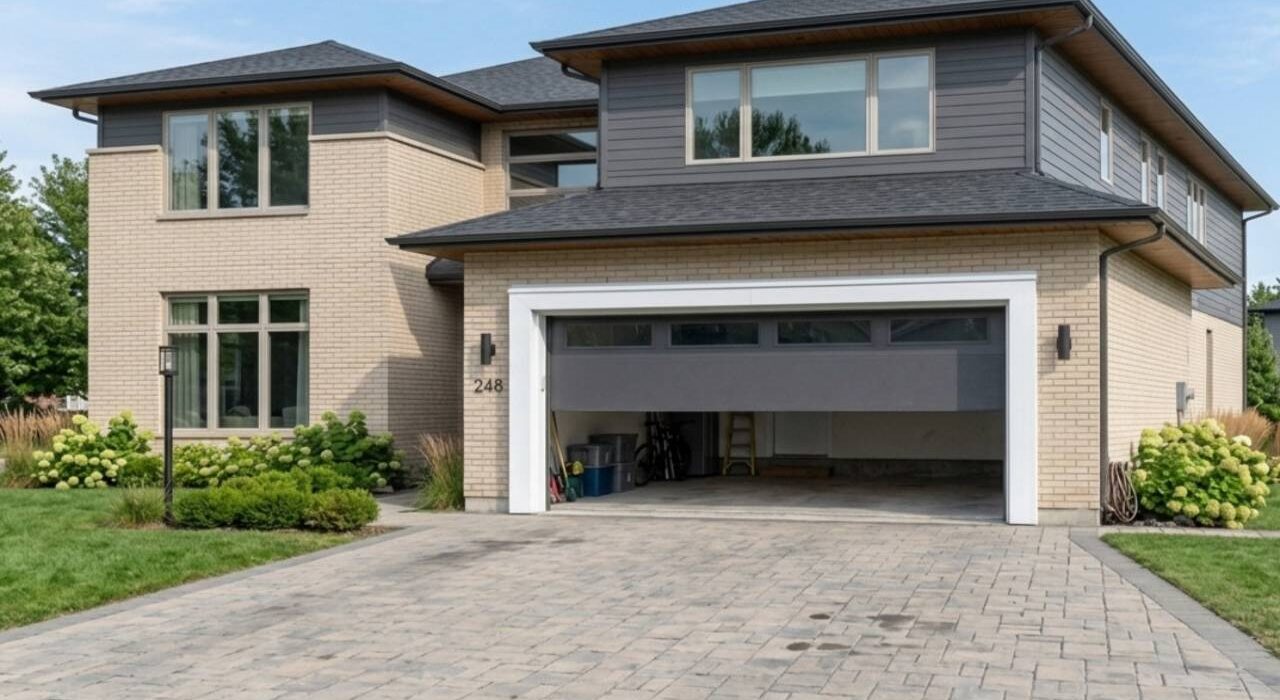
Pull up to a premium home in Southeast Oakville, Bronte, Roseland, or Tyandaga where professional garage door caulking protects the single most dominant architectural feature on the facade. The vehicle bay opening is massive, the surrounding trim is prominent, and the framing represents a significant portion of your home’s exterior identity.
Despite this heavy structural responsibility, this critical perimeter frame line remains one of the most consistently neglected maintenance items on any residential building envelope. Most homeowners simply never look at it. The garage door opens, the car goes in, and the door closes.
The perimeter trim remains in your peripheral vision at best, receiving absolutely no attention until the underlying damage becomes impossible to ignore. By the time the consequences finally become visible to the naked eye, the destruction hidden behind your exterior cladding has usually been building for years.
The Physics of Mechanical Vibration and Adhesive Failure
The garage door frame is structurally unlike every other sealed opening on a residential exterior, and this difference matters for sealant performance. A standard window frame is essentially static once installed, moving almost entirely through predictable thermal expansion and contraction.
The architectural sealant around a regular window is simply managing slow, temperature-driven dimensional changes across a seasonal timeline. A heavy vehicle bay entrance, however, introduces aggressive mechanical stresses that standard window openings never experience.
A garage door frame operates as a dynamic, high-load mechanical system. Every time your automatic garage opener is activated, the heavy sectional door panel travels along steel tracks bolted directly into the structural wood framing and exterior trim surrounding the opening.
The door itself typically weighs between 70 and 150 kilograms depending on its panel material, steel gauge, and insulation thickness. This massive rolling weight generates intense inertial forces as it accelerates, decelerates, and impacts the closed position against the ground.
Those heavy operational shockwaves travel instantly through the tracking hardware, vibrating into the jamb framing before radiating outward into the surrounding trim and perimeter sealant joints.
This continuous structural frame shifting and intense track vibration create a destructive failure environment that standard retail products are not engineered to survive. Cheap big-box store acrylic latex caulks cure into a rigid, plastic-like consistency with very limited elongation capabilities.
The repetitive micro-movements at a garage frame perimeter exceed these low elongation limits within a few seasons, causing the bead to fail in one of two distinct ways. Cohesive failure occurs when the center of the bead tears cleanly down its length under cyclic stress.
Adhesive failure occurs when the material releases its bond from the brick facade or aluminum cladding substrate entirely, leaving a clean, wide-open gap. Both failure modes produce the exact same outcome: an unshielded, open joint wrapped around the largest and most exposed architectural opening on your home’s facade.
The base junction of the garage door frame, where the vertical jamb trim meets the asphalt or concrete, is also a highly stressed transition zone between vertical framing movements and horizontal pavement shifting.
Reviewing our comprehensive guide to driveway control joint sealing outlines how these horizontal slabs move independently at grade level, demonstrating why the base of your garage door frame requires a heavy-duty, vibration-resistant seal to prevent water from undermining the garage foundation.
The Consequences: Rotted Wood Jambs, Freezing Drafts, and Pest Highways
The garage door frame perimeter is one of the highest-exposure joints on a residential building envelope. It faces the prevailing weather on whichever elevation it occupies, receiving direct impact from wind-driven rain and heavy snow.
Because of the massive size of the opening, any water that bypasses the sealant lines has an expansive surface area of trim, capping, and framing to infiltrate.
When a perimeter sealant fails at the garage door frame, water entering the joint does not simply run down the exterior face of the brick facade.
It penetrates directly behind the aluminum cladding capping or vinyl brick moulding that wraps the underlying structural wood jamb.
Once inside, that water remains completely trapped in a closed environment with zero drainage or evaporation pathways. The concealed wood jamb continuously absorbs this trapped moisture across every passing rain event.
Destructive wood rot initiates at moisture levels above approximately 20 percent wood moisture content and advances progressively once established. The structural wood framing forming the garage door rough opening operates as a vital load-bearing element.
This heavy framing carries the header load above the vehicle bay opening, provides the secure structural backing for tracking hardware, and ties the surrounding wall assembly together.
Rotting wood inside a load-bearing garage jamb is an immediate structural failure mode, not a cosmetic issue. It remains entirely invisible behind your aluminum trim capping until the structural damage is critically advanced.
For reference on the standards used by professional home inspectors when evaluating this type of severe moisture risk, the exterior structural inspection standards published by the International Association of Certified Home Inspectors provide the technical framework for assessing structural framing rot risk stemming from building envelope failures.
Water that reaches the upper sections of the garage frame, at the head trim or the transition between the door opening and the roofline, follows gravity downward straight through the wall cavity.
This hidden moisture pathway is frequently responsible for interior water stains appearing well below the actual leak source on your property.
Our article on window frame leaking water and upper envelope water paths details how moisture infiltrating an upper cladding joint travels silently through wall assemblies and manifests as damage at a lower location, making the source exceptionally difficult to pinpoint without a comprehensive building envelope inspection.
The energy performance consequences of a compromised garage frame seal are equally significant. A failed perimeter seal around a standard double-car garage frame creates an open gap with a combined linear length of eight to ten metres.
Cold air infiltrating through that unshielded frame line during a cold Ontario winter does not stay contained inside the garage.
This freezing air migrates through electrical penetrations, shared wall assemblies, and the main entry door connecting the garage to your primary conditioned living spaces.
Homeowners across Oakville and Burlington who notice persistently cold floors or freezing rooms adjacent to the garage are often experiencing the thermal consequences of a failed garage frame seal rather than a heating system deficiency.
Unsealed garage door frame perimeters also serve as direct highways for structural pest infestations. The gap left behind by a split trim seal is easily wide enough for mice, which routinely compress their bodies through openings as small as six millimetres in diameter.
Open seams also invite foraging carpenter ant columns that follow interior wall cavities directly into the structural wood elements of your main house.
Our article on pest prevention window caulking and how perimeter caulking stops rodent and insect migrations covers our full, comprehensive structural methodology for closing these hidden pest entry pathways permanently across your entire building envelope.
Critical Failure Indicators Around Garage Door Trims
A careful inspection of your garage door frame perimeter at the start of each season takes ten minutes and identifies every active failure point before the damage cycle advances further. The following indicators are what a professional building envelope assessment looks for at every garage door opening.
Deep Unsealed Voids and Missing Foam Backing Behind Trim
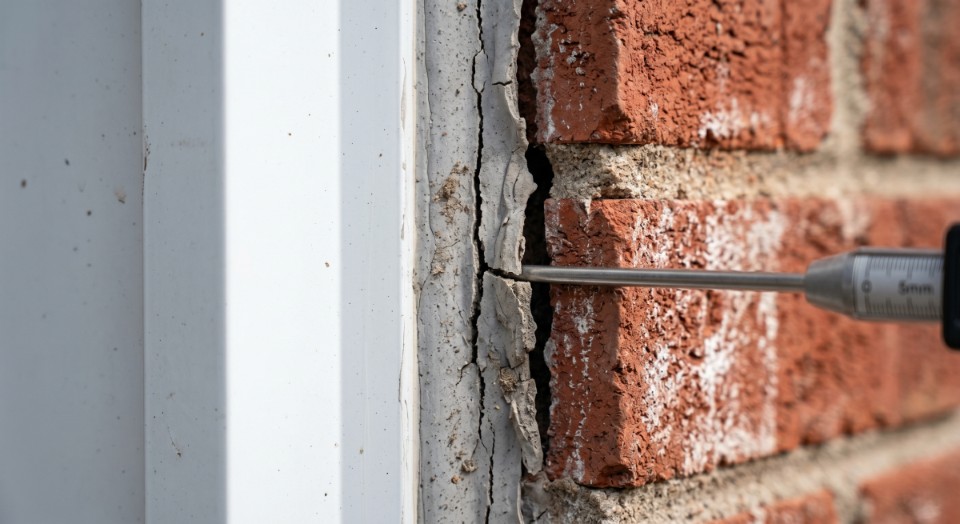
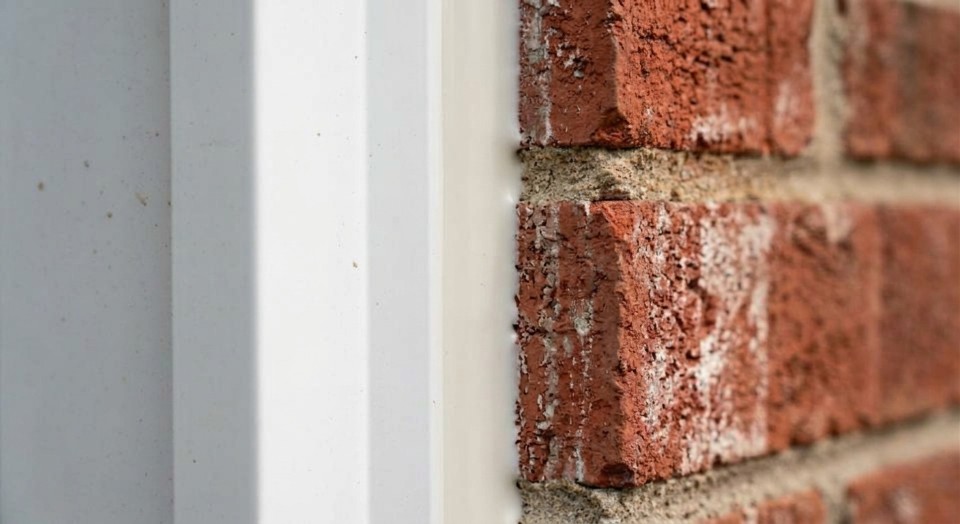
A joint where the caulking has fully debonded and fallen out, or where the original installation was never completed, presents as an open gap at the trim-to-brick interface with visible depth into the cavity behind the cladding.
In wide gaps where the clearance between the rough wood jamb and the surrounding masonry exceeds ten millimetres, the absence of backer foam behind the sealant line is a further indicator of improper original installation.
A joint this wide with no backer rod has either never been correctly sealed or has lost all its backing material to moisture degradation.
Lengthwise Adhesive Splitting Down the Centre of the Bead
A sealant bead that appears continuous at the substrate faces but shows a crack running along its centreline is exhibiting the classic signature of three-sided adhesion failure under cyclic vibration loading. The compound bonded to the back of the joint cavity and tore through the middle as the frame moved.
This failure mode is particularly common at garage door perimeters precisely because the vibration cycle frequency is higher than at any other residential joint. The joint is open and water-transmitting despite the apparent presence of sealant.
Peeling, Chalking, or Brittle Caulking Material Degradation
Sealant that peels away from the substrate in strips, surfaces with a powdery white chalking deposit, or crumbles under light finger pressure has undergone irreversible UV photodegradation and has lost all its elastomeric properties.
It cannot be restored by surface treatment or overcoating. It must be fully extracted and replaced with a correctly specified compound. These degradation indicators are particularly visible on south and west-facing garage elevations where UV exposure is sustained and intense during the summer months.
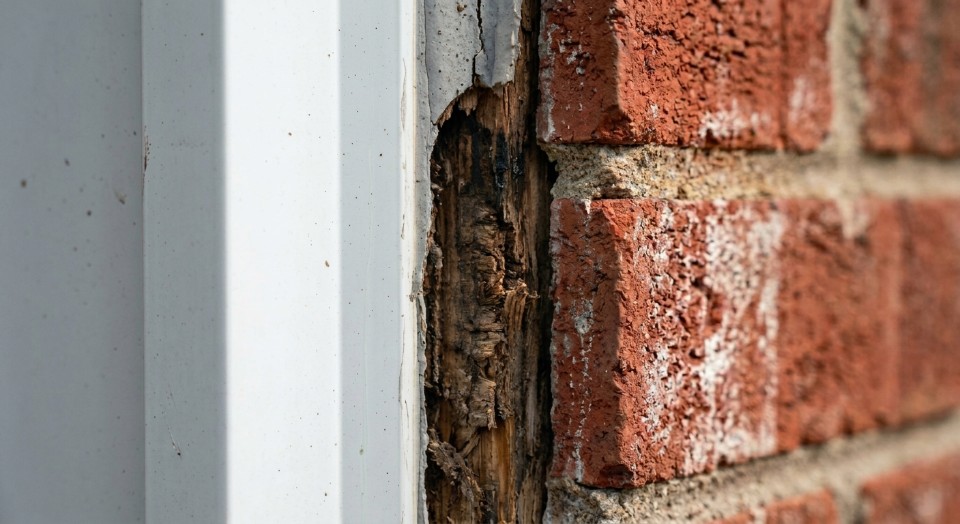
Discoloured Wood Trim, Soft Spots, or Water-Stained Drywall
Visual discolouration or dark staining on painted wood trim surfaces adjacent to the sealant line indicates moisture has been reaching the wood substrate. Soft spots in painted trim, where the surface depresses under light pressure, confirm that the wood has absorbed enough moisture to begin cellular breakdown.
Interior water staining on drywall adjacent to the garage door wall, particularly at the header height or along the shared wall between the garage and an adjacent room, confirms that water has penetrated the wall assembly and is reaching interior finishes.
These interior indicators typically appear one to three seasons after the exterior sealant failure that initiated the moisture pathway.
Pests, Ants, and Persistent Drafts Penetrating the Vehicular Bay
Persistent cold drafts felt inside your garage during the winter months, particularly along wall areas directly adjacent to the door frame, confirm active air infiltration through failed perimeter joint gaps.
These unshielded thermal breaches degrade your home’s energy efficiency by continually pulling freezing air into nearby living spaces.
Visible ant trails travelling along the base of the garage door trim, or rodent activity discovered inside a vehicle bay with a tight bottom seal, confirm that your perimeter frame joints are providing direct entry pathways from the exterior.
These open gaps welcome pests straight into your wall cavities, allowing them to migrate deeper into the main house structure.
The Surgical Workflow for Vibration-Resistant Joint Restoration
A surface patch over a vibration-fatigued or contaminated garage door frame sealant will not hold through a single season of door operation. The old compound has either debonded from the substrate, torn cohesively under cyclic stress, or both.
New sealant applied over a failure surface bonds directly to the degraded compound rather than to the clean substrate. The installation inherits the same underlying adhesion weakness, triggering an identical split under vibration loading in the exact same location.
The only approach that produces a vibration-resistant, lasting result is complete mechanical extraction to bare substrate. This must be followed by correct joint geometry engineering and the application of a flexible compound specified for dynamic multi-axis movement conditions.
Phase 1: Stripping Vibration-Fatigued Materials and Trim Overlays
All existing sealant, old foam backer, adhesive residue, and organic material in the joint is removed completely using oscillating tools, detail scrapers, and specialty solvents.
The extraction target is bare brick on the masonry face and bare aluminum, vinyl, or primed wood on the trim face, leaving zero residual compound or compressed backing at either interface.
At the base of the garage frame where the vertical trim transitions to the pavement, the joint extraction extends directly into the horizontal transition seam.
This meticulous process ensures total continuity of the new weatherproofing seal across the entire lower corner condition.
An incomplete extraction that leaves old material at the corner junction produces differential adhesion failure under the first combination of winter frost and automatic door tracking vibrations.
As our article on commercial exterior caulking services details, the mechanical cleaning standard does not change based on whether the substrate is a residential driveway or a corporate precast panel.
The adhesion chemistry is governed by substrate cleanliness, not project category. Stripping everything down to clean, raw edges is the only way to build a reliable commercial bond.
Phase 2: Extracting Track Lubricants and Hydrocarbon Contaminants
After mechanical extraction, all joint faces are cleaned with specialized solvents to strip away hidden adhesive residue, paint overspray, and atmospheric pollution. At garage door perimeters, this step specifically targets grease or lubricant contamination that frequently migrates from the door tracks onto adjacent trim surfaces.
Hydrocarbon contamination from automatic garage door lubricants completely prevents proper sealant adhesion regardless of product quality if it is not fully extracted from the bonding zone. During cleaning, the exposed wood substrate at the jamb face is evaluated for moisture content and early rot indicators.
Any wood showing signs of moisture-induced cellular breakdown is flagged for remediation before sealing. Enclosing a moisture-damaged wood substrate behind new sealant blindly traps the existing water, accelerating hidden rot behind the aluminum capping until the damage becomes structurally significant.
Phase 3: Deep Cushion Backing for Continuous Dynamic Tracking Loads
Wide gaps between rough masonry openings and garage door trim components require a backer rod installed at the correct depth before sealant application. For garage door frame applications, closed-cell backer rod is specified for its superior water resistance, compression safety, and the clean non-bonding surface it provides for the sealant face.
Open-cell foam absorbs water in this heavy exposure environment and transfers it behind the sealant face, directly undermining the weatherproofing function the installation is intended to provide.
For the authoritative engineering standards governing slab-on-grade joint design and sub-base protection, the American Concrete Pavement Association (ACPA) published guidance on concrete pavement joint sealing defines the technical baseline that professional hardscape contractors and sealant applicators work from when specifying horizontal joint systems.
As outlined in our guide to professional joint preparation, the full structural rationale for installing a foam backer rod in deep horizontal joints includes why the two-point adhesion geometry it creates is the fundamental requirement for elongation performance under load.
This specific geometry allows the finished compound to survive the continuous cyclic tracking loads that an automatic garage door opener generates.
Phase 4: Tooling High-Elongation Vibration Damping Barriers
Our installation crew injects the specified high-movement polymer deep into the prepped joint track using advanced equipment that maintains uniform bead volume throughout the full perimeter run, including all corner transitions.
The finished bead is carefully hand-tooled to a smooth, slightly concave profile with a dedicated masonry trowel to ensure complete structural contact. This specific concave profile ensures full two-point adhesion on both substrate faces.
It establishes the correct cross-sectional geometry for maximum elongation under combined track vibration and thermal movement.
This structural flexibility allows the cured compound to safely expand to one and a half times its original joint width during extreme temperature shifts without tearing away from the brick or trim substrates.
Taking the time to execute this high-elongation installation creates a permanent shock-absorbing weatherseal that easily survives the ongoing slamming and rattling of a heavy automatic garage door.
Protect Your Garage Frame Before the Damage Goes Structural
A failed garage door frame sealant line is not a maintenance item that can wait another season. Every single rain event that drives wind-driven water behind your aluminum capping advances an invisible, progressive moisture tracking condition.
Deferring this simple exterior weatherproofing fix simply makes your ultimate property remediation significantly more expensive with each passing month. Rotted structural garage jambs require extensive, costly carpentry reconstruction long before any new weatherproofing can begin.
Interior drywall damaged by water migrating through the wall assembly requires independent interior remediation and paint matching. Furthermore, hidden insect infestations established inside your damp wall cavities eventually mandate professional extermination.
Delaying your exterior building envelope maintenance never prevents these expensive structural outcomes. However, all of them are successfully stopped by addressing the moving perimeter joint before the hidden rot damage cycle begins.
Contact Oleg at Proper Caulking to book an expert, on-site garage frame joint assessment for your Oakville or Burlington property today. We meticulously inspect the full door perimeter trim, the upper head transitions, and the base junction at the driveway concrete slab.
Our team provides a completely transparent evaluation of your building envelope, giving you honest data on your current sealant health. We deliver a detailed, upfront project estimate backed entirely by our industry-leading 10-year workmanship warranty.
Booking early in the season ensures your protective silicone installation is complete and fully cured before peak seasonal weather cycles arrive.
To evaluate our extensive menu of architectural building envelope protections, you can examine our main service index to analyze our full range of professional weatherproofing solutions.
Our regional trade specialists install high-movement, commercial-grade exterior polymers engineered explicitly to seal deep moisture migration paths and permanently block structural draft points throughout the Halton community.
Protect Your Garage Framing From Hidden Wood Rot and Drafts
Don’t let mechanical door track vibrations shatter your perimeter seals, rot your load-bearing wood jambs, or pull freezing air into your home. Contact us for a specialized, professional garage frame joint assessment today.
Proper Caulking – Oakville & Burlington, Ontario