
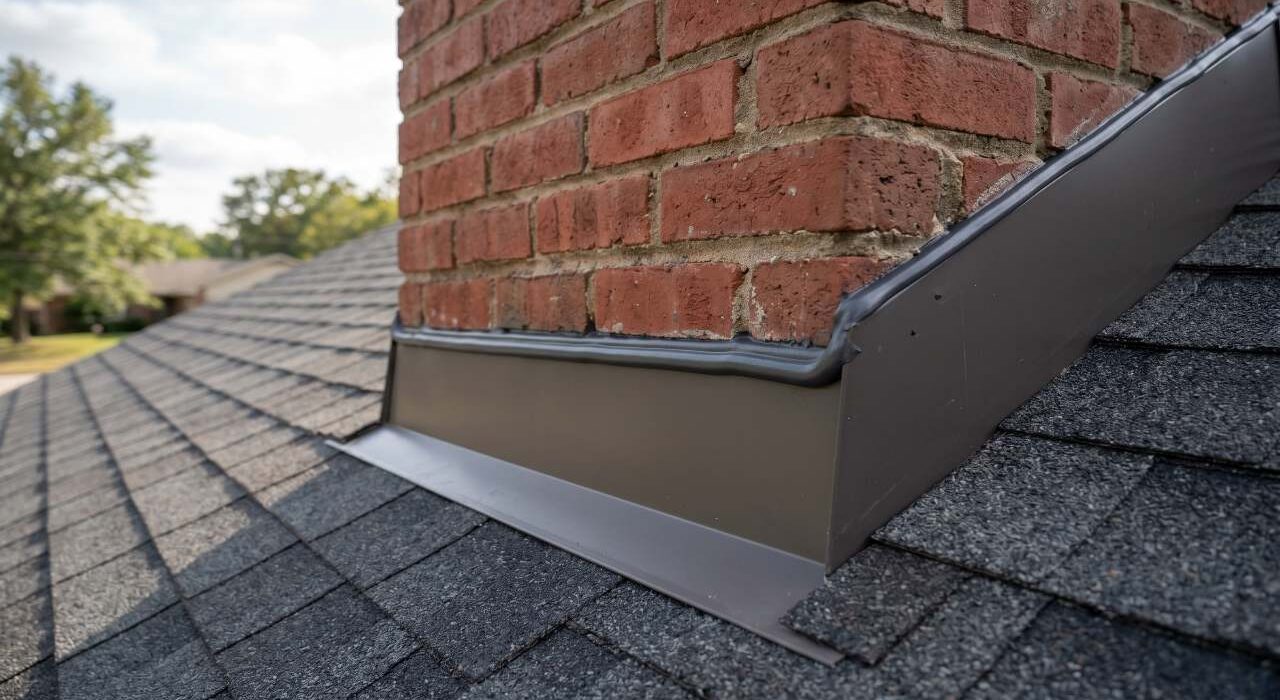
Look up at your roofline in Oakville, Burlington, or Milton and find the brick chimney column rising above the shingles. Protecting this high-altitude focal point relies on specialized exterior chimney caulking to form a permanent, flexible weather barrier against hidden roofline rot and sudden interior water damage.
That brick chimney structure stands as the single most weather-exposed masonry assembly on your entire home. It features absolutely no protective eave overhang, no shielding soffit, and no adjacent wall cladding to deflect severe wind and driving storms away from its vulnerable seams.
Most local homeowners never inspect their chimney flashing tracks until visible brown water stains appear on the bedroom ceilings directly below them. By that point, the unshielded moisture infiltration has typically been actively rotting out the internal roofing framework for multiple seasons.
Chimney Physics: Direct Solar Baking and Multi-Material Expansion Disparity
An unshielded roofline chimney absorbs brutal solar radiation with absolutely zero surrounding trees or structural overhangs to provide shade or minimize the thermal load on its surfaces.
Overlapping metal counter-flashing strips, usually fabricated from aluminum or galvanized steel, absorb this baking heat intensely, reaching extreme surface temperatures that far exceed ambient outdoor conditions on a standard summer afternoon.
Sheet metal resting at these elevated temperatures expands significantly and rapidly across its linear length. The structural clay brick masonry making up the main chimney shaft responds to this intense solar heat in a completely different manner.
Clay brick features an immense thermal mass that causes it to absorb heat slowly, expand slowly, and shift at a completely separate rate and direction than the thin metal flashing tracks. This conflicting movement places the horizontal seam between the counter-flashing edge and the brick face under massive multi-axis shear loading every single afternoon the sun hits that side of the roof.
Low-grade consumer caulks applied along this complex junction quickly crack and unzip under that relentless shear strain within just one to two seasons. This premature material breakdown leaves a wide gap at the metal-to-brick interface that funnels every rain event straight backward behind the flashing apron.
For a broader building science overview of why overlapping dissimilar materials generate this exact type of failure loop, our article on exterior transition caulking details the coefficient disparity physics that govern all multi-material junctions across a property facade. Recognizing these independent expansion pathways allows you to intercept hidden moisture tracking before it breaches your roofline.
Because different architectural elements expand and contract along entirely separate axes, calculating the precise movement tolerances of each substrate is a mandatory structural requirement.
Evaluating the severe thermal friction generated across these unshielded roofline transitions requires strict alignment with the engineering guidelines set by the FEMA Building Science structural design parameters framework.
Adhering to these established thermal metrics ensures that our custom-tooled elast危eric joints maintain an airtight, elastic bond even when heavy brick masonry structures and lightweight sheet flashings move independently under direct sunlight. This advanced engineering baseline guarantees that our high-movement seals will never rupture or pull apart when exposed to intense, unshielded weather loading.
The vertical contraction relief joints built directly into the brick chimney body itself are a separate but highly related building envelope maintenance priority.
Our comprehensive guide on brick masonry expansion joint caulking breaks down the long-term moisture expansion behavior of clay brick and explains why those vertical seams must be maintained independently of the flashing perimeter to preserve your home’s overhead weather barrier.
The Hidden Attic Trap: Ceilings Damaged by Chimney Core Leaks
When a chimney flashing seal fails, water does not simply run down the exterior brick face and drip safely off your roof edge. Instead, it enters the gap between the counter-flashing and the brick, follows the flashing profile inward, and tracks behind the waterproofing layer at the roof deck level.
From that entry point, the water has two primary paths of travel through your home’s structure. It can track along the roof deck surface inward toward your attic space, reaching the structural rafter ties and attic floor framing. Or, it can follow the chimney core itself, travelling down the interior masonry face of the chimney stack through the wall cavity to emerge at a lower elevation.
Both paths deliver moisture straight to hidden structural timber elements with absolutely no interior visual indicators until significant absorption has already occurred. Rafter ties saturated through a chimney leak develop deep rot that does not produce any visible ceiling signs until the moisture has transferred to the ceiling drywall finish.
That transfer typically requires multiple seasons of active infiltration to break through your internal vapor barriers. By the time a homeowner finally sees a brown water stain on their bedroom ceiling below a chimney, the timber framing above that ceiling has been absorbing moisture long enough to initiate structural wood rot.
In humid summer conditions, this trapped moisture will quickly support active mould growth in your unventilated attic space. The interior remediation required at that stage goes far beyond standard ceiling drywall patch repairs.
It includes a comprehensive attic inspection, structural timber assessment, mould remediation treatment, and full insulation replacement in the affected area. All of this destructive home damage originates from a basic sealant failure at the chimney flashing perimeter that could have been addressed for a tiny fraction of that cost.
Our Specialized 4-Phase Chimney Restoration Workflow
Layering fresh caulking straight over a weathered chimney flashing joint creates a superficial seal that tears open long before the next autumn heating season arrives. Structural roofline joints located around chimney bases naturally collect a dense, baked-on layer of environmental contaminants.
This buildup includes active soot from furnace exhaust, sticky airborne sap resins from nearby evergreen trees, environmental carbon dust, and brittle polymer residue from past repairs.
Injecting premium caulks directly over this uncleaned grime means the new material binds strictly to a loose film of dirt instead of locking onto the true architectural substrates. The compound inevitably unzips and peels away when exposed to the very first intense shift in seasonal weather.
Building a permanent weatherseal across these high-exposure roof perimeters demands a meticulous breakout that reveals raw, unblemished sheet metal and clean masonry on both sides of the channel.
Phase 1: Precision Scraping of Weather-Baked Roofline Joints
Our repair technicians completely strip out every trace of degraded compound around the full perimeter of your chimney housing using dynamic oscillating multi-tools, manual detail scrapers, and thin extraction blades.
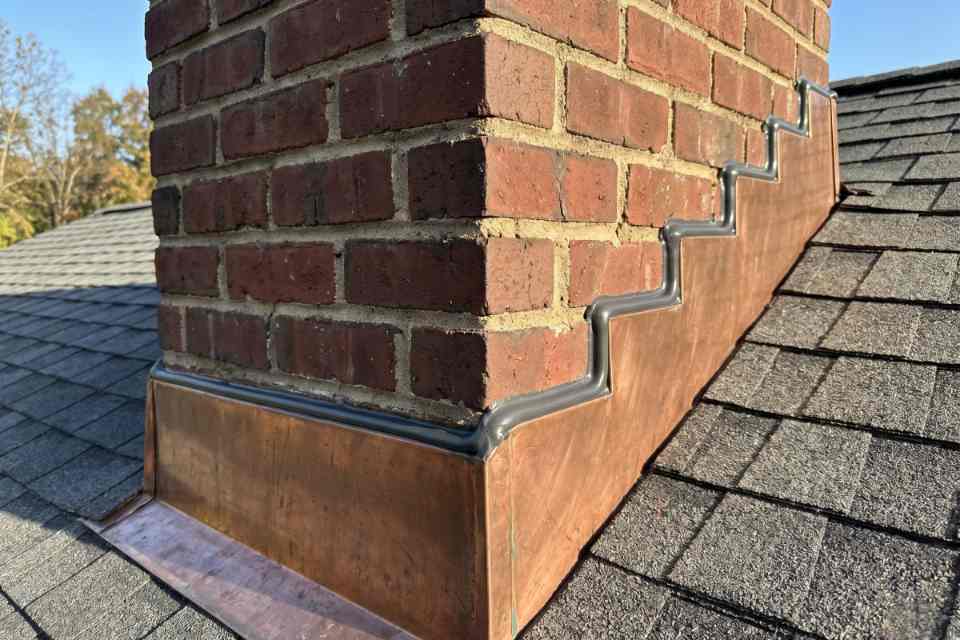
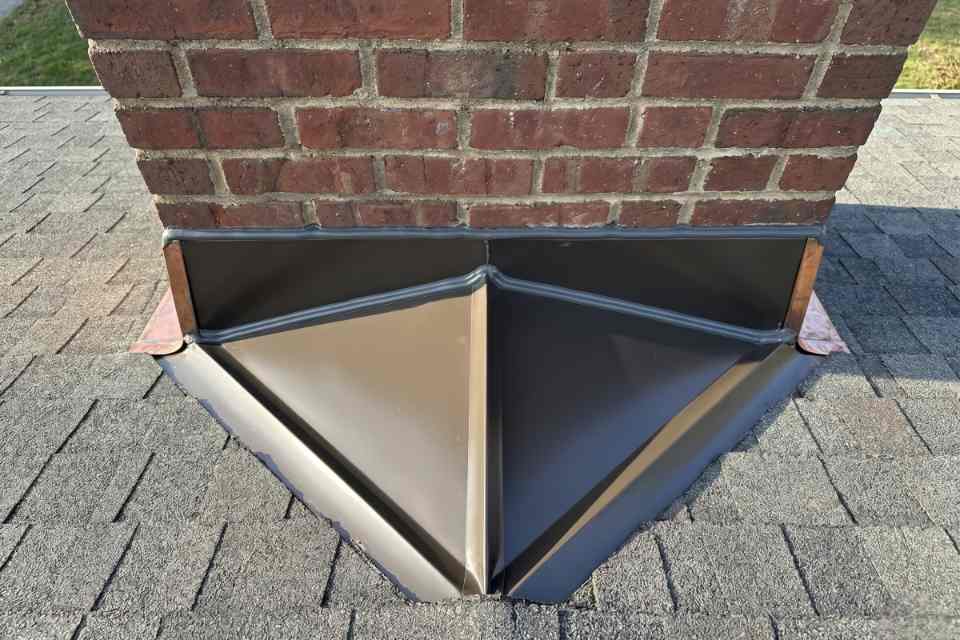
This painstaking extraction phase handles the angled, stepped flashing channels slicing up the pitched roof slopes, the horizontal counter-flashing reglet track cutting into the mortar lines, and the low-profile roof cricket or saddle seams situated at the back of the masonry block.
A professional chimney weatherstripping project must protect both the easily visible front aprons and the hidden, stepped back channels sitting on the high side of the roof deck. These upper rear joints handle the heaviest stress from winter ice dam formations and cascading water runoff.
Addressing only the exposed front tracks while ignoring the hidden rear saddle seals is an incomplete repair that completely fails to stop subsurface attic water tracking.
Phase 2: Stripping Environmental Carbon, Chimney Soot, and Airborne Resins
Following complete mechanical extraction, the raw sheet metal profiles and adjoining brick substrates are scrubbed deep with specialized chemical solvents. Corrosive chimney exhaust oils represent a highly specific, sticky environmental contaminant that accumulates strictly along roofline masonry joints and never appears on standard residential door or window casings.
Even on modern gas fireplaces that give off minimal visible soot, the intense temperature fluctuations of the venting masonry generate a fine, acidic condensation layer that ruins material adhesion if it isn’t chemically neutralized.
Once these metal flashing surfaces are cleared of all film residue, we carefully audit the underlying steel or copper sheets for deep corrosion tracking, as heavily rusted flashing must be physically replaced before any new weatherseal can be applied.
Phase 3: Seating High-Density Backing Foam Cushions Along Stepped Seams
The horizontal cap lines and stepped masonry transitions are wide enough to require an underlying backing rope before we inject any structural polymer. Maintaining a consistent joint depth across these multi-material channels is incredibly important because the thermal movement amplitude at your roofline is substantially higher than at any other flashing line on your home.
As detailed in our guide to professional joint preparation, installing this flexible backup foundation is mandatory to prevent your sealant from tearing under severe structural shifting.
We utilize high-density closed-cell backing foam for all overhead chimney joints because its slick, non-porous skin completely stops moisture from soaking into the backing material and freezing during brutal Ontario winter drops.
Phase 4: Tooling High-Movement, Non-Corrosive Polyurethane Barriers
Our field crew injects a specified, high-movement industrial polymer deep into every prepared flashing seam using professional equipment. This heavy-duty application guarantees consistent bead volume throughout your layout.
The finished bead along each linear foot of metal is hand-tooled to a smooth, downward-sloping concave profile. This sharp profile forces running rainwater to slide off the masonry edge and drop harmlessly onto your asphalt shingles.
On the critical rear chimney cricket or saddle junction, this tooled profile is carefully pitched to guide water away from the joint face. This directed channel shortens water dwell time during heavy downpours.
The specialized, heavy-gauge polyurethanes we deploy to seal roofing flashings are formulated to withstand relentless climate shifts, ultraviolet radiation, and wind-driven rain. These commercial elastomeric compounds are engineered to meet strict Canadian building regulations.
Our selected compounds align perfectly with the rigorous architectural durability metrics detailed in the official CSA Group roofing standard index. This superior material engineering enables the cured rubberized bead to expand and compress seamlessly without unzipping from the metal flashing tracks.
Tooling this custom-sloped compound along your mid-wall transitions forms a permanent, shock-absorbing barrier. This flexible seal easily handles the heaviest water loads streaming down your exterior facade.
5 Signs Your Chimney Flashing Joints Need Immediate Attention
A roofline or upper-floor inspection at the start of each season identifies every active chimney flashing failure before moisture reaches the attic framing or ceiling drywall. Spotting these subtle warning tracks early allows you to correct the tracking moisture before it targets your home’s plywood sheathing.
Left unsealed, these expanding roofline gaps also invite destructive wood-boring bugs and wasps to invade your structural framework. To discover how unshielded outdoor gaps turn into active pest highways, read our article on pest prevention window caulking to learn how to insulate your property boundaries.
1. Visible Separation Along the Metal Counter-Flashing Edge
Any visible gap between the counter-flashing edge and the brick face at any point around the chimney perimeter is an active water entry point. This narrow separation delivers structural infiltration behind the flashing apron with every single driving rain event.
2. Brittle, Cracked, or Delaminated Flashing Beads
Sealant that is cracked, hard, or pulling away from the metal flashing face on the front or side seams has undergone thermal shear failure. This material degradation characterizes this joint type under unshielded roofline exposure conditions.
3. Progressive Rust Staining Tracking Down the Brickwork
Rust staining on brick surfaces below the flashing line or on the roof deck confirms that water has breached the sealant barrier. This staining proves that water is actively contacting internal metal components and tracking outward to the visible surfaces.
4. Interior Ceiling Staining and Bubbling Drywall
Interior ceiling staining, paint bubbling, or soft drywall directly below or adjacent to the chimney location confirms that water has been infiltrating through the flashing seam. This water tracking reaches the interior finish by slipping straight through your attic framing or wall cavity.
5. Original Builder Seals Exceeding 10 Years of Total Exposure
Any chimney flashing sealant that was applied during original construction and has not been professionally replaced is operating well beyond its expected service life. Even if the old compound appears smooth from ground level, its deep molecular adhesion against the flashing has vanished.
Armor Your Chimney Flashing Before Attic Framing Rot Sets In
A compromised chimney flashing weatherseal represents an immediate threat that dumps cascading rainwater straight into your roof rafters, attic insulation, and interior bedroom ceilings.
Left unsealed, this moisture migration tracks silently behind your drywall through multiple seasonal storm cycles until extensive timber decay forces a massive water stain to break through your finished ceiling.
Intercepting this degradation early costs a tiny fraction of the thousands of dollars required for emergency mold extraction, structural rafter reconstruction, or internal ceiling drywall replacement.
Coordinate an On-Site Chimney Joint Analysis
Contact Oleg at Proper Caulking to schedule a specialized roofline perimeter structural analysis for your Oakville, Burlington, or Milton property today. Our technical field crew methodically checks every single vertical masonry junction, metal counter-flashing channel, and rear drainage valley across your roof layout.
Our technical field division delivers a precise, line-item summary detailing where your overhead barriers are breaking down and which framing pockets are exposed to water tracking. We completely eliminate future risk by securing our specialized utility weatherproofing applications with a comprehensive 10-year trade warranty on all labor.
Deploying this custom perimeter shield early in the spring weather window is the most reliable way to insulate your exterior utility connections before peak storm cycles hit the Halton region.
Protect Your Attic and Ceilings From Leaky Chimney Flashings
Don’t let cracked counter-flashing seams or failed chimney saddle joints rot out your attic rafters, ruin your finished bedroom ceilings, or foster hidden mold growth. Contact us for a specialized, professional chimney flashing joint assessment today.
Proper Caulking – Oakville, Burlington & Milton, Ontario