

If you are spending this summer constantly wiping ants off your windowsills, it is time to look at the structural root cause of the issue. When it comes to effective pest prevention, Burlington homes require a permanent physical block rather than a temporary chemical solution. In my 18 years as the owner of Proper Caulking, I have learned that nine times out of ten, summer bug infestations start when exterior window sealants dry out, crack, and leave a wide-open pathway for insects to crawl straight into your home.
I am Oleg, and over nearly two decades of servicing homes from Shoreacres to Alton Village, I have seen this exact scenario play out hundreds of times: a homeowner pays for a spray treatment, but three weeks later, the ants return. The chemicals washed away in the rain, but the structural entry points remained. Let me show you why seasonal pesticide sprays fail, what a professional fix looks like, and how to identify the failing exterior window seals that are letting summer bugs inside.
Why Chemical Sprays Fail the Summer Barrier Test
Pest sprays work on a simple principle: apply a chemical barrier, bugs touch it, bugs die. The problem is that barrier has a lifespan measured in days, not years. Burlington summers bring heavy rain, intense UV exposure, and humidity swings that degrade surface treatments quickly. One decent thunderstorm can wash a perimeter spray off a foundation ledge or window sill almost completely. Exterminators will tell you this themselves when they explain why you need a recurring service contract.
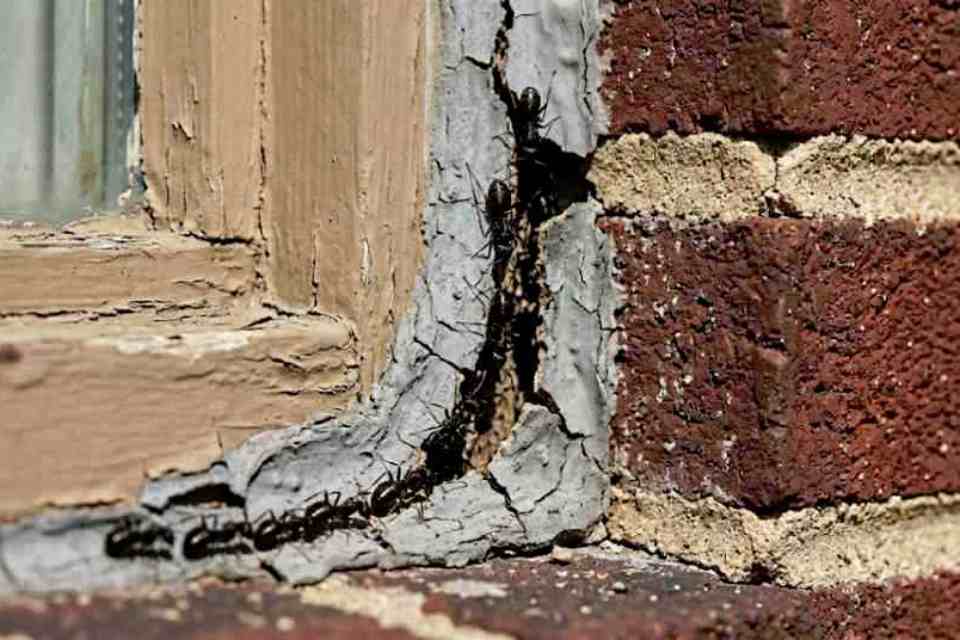
The deeper problem is that chemical sprays do nothing about the structural gap that attracted insects in the first place. Ants communicate through pheromone trails. When a scout finds an entry point into your home, it marks the route chemically, and every worker in the colony follows that scent highway. Even if a spray kills the first wave, the pheromone trail remains active in the gap itself.
The next wave follows it right to your kitchen. Sealing that gap with a professional-grade compound does not just block the path physically. It eliminates the trail entirely by removing and cleaning the channel before the new sealant goes in. No entry point, no trail, no ants.
Why DIY Sealing Fails the Insect Shield Test
Walk into any hardware store in Burlington and you will find a wall of caulking tubes in the $5 to $12 range. Most of them are latex-based, water-cleanup products designed for interior trim work, painting over, and cosmetic gaps. They are not designed to live outside, flex through a Burlington winter, or resist insects that physically push, burrow, or chew through degraded material.
Here is the real-world failure cycle with retail caulk on an exterior window joint. It goes on fine in August. By November, thermal movement, as the frame and surrounding masonry or vinyl expand and contract at different rates, has started creating micro-tears.
By February it is visibly cracked or pulling away on at least one edge. Come May, it is a paper-thin shell that a carpenter ant can push right through, or tunnel under where it has separated from the substrate. The sealant did not fail because it was applied badly. It failed because it was not the right product for the job.
Older neighbourhoods like Shoreacres and Roseland present a particular challenge. The mature tree canopy in those areas means carpenter ants are a constant presence in the soil and wood around homes built decades ago with original window seals that have never been replaced.
Homes in newer developments like Alton Village or The Orchard face a different issue: high wind exposure on open lots forces earwigs and boxelder bugs into any gap they can find on the windward side of the building. In both cases, retail latex caulk is not a solution. It is a temporary patch on a structural problem.
The Proper Caulking Shield: Our 6-Step Structural Sealing Method
What we do at Proper Caulking is not caulking in the retail sense of the word. It is structural joint sealing, and the difference matters for both pest prevention and the long-term integrity of your building envelope.
Here is what the process looks like on a standard exterior window circuit. It completely turns your vulnerable windows into an airtight, insect-proof barrier.
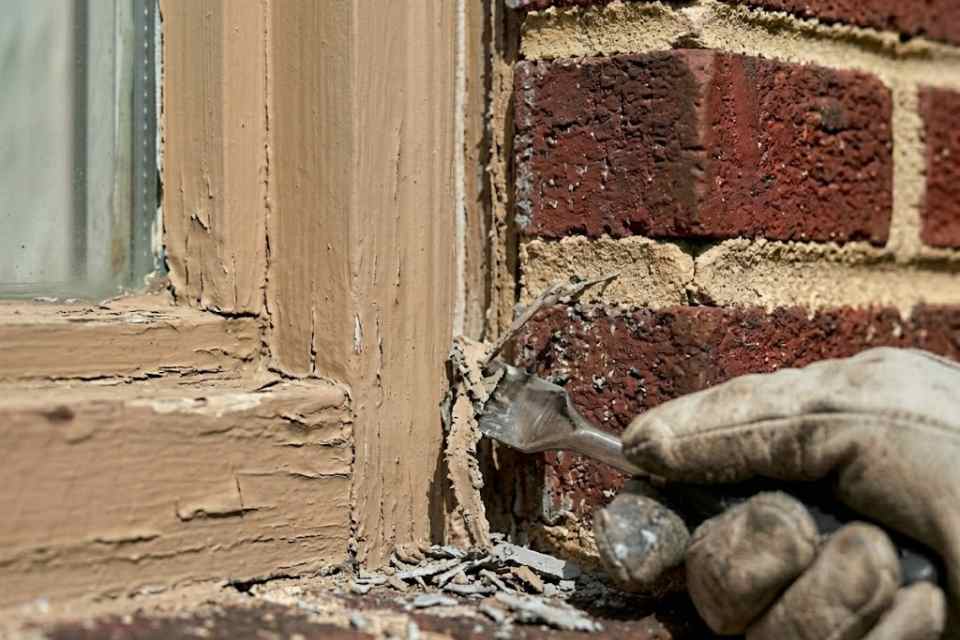
Phase 1: Complete Extraction of Compromised Entry-Point Compounds
We remove every trace of the old compound, including failed caulk, degraded foam backer, and any debris collected in the joint. We use oscillating tools, hook scrapers, and solvent where needed to ensure the channel faces are completely stripped.
Leaving old sealant in place and caulking over it is one of the most common DIY mistakes that leaves entry tracks wide open. New compound needs clean, bare substrate to form a proper adhesive bond that pests cannot bypass.
Phase 2: Neutralizing Pheromone Trails and Organic Residues
Before any new material goes in, we clean the channel with specialized contact cleaners and compressed air. This critical flushing process is executed specifically to eliminate invisible insect pheromone residue, construction dust, and organic material bugs are attracted to.
Wiping out these chemical scent trails completely disorients foraging scout ants, preventing future colonies from tracking back to your windows. This step is vital for long-term pest prevention and is skipped entirely in standard patch jobs.
Phase 3: Structural Frame Separation and Micro-Gap Auditing
We inspect the full perimeter of each window for movement cracks, substrate separation, and signs of moisture intrusion. Your exterior window seal operates as your home’s absolute last line of defense between your wall assembly and the weather.
If there is a structural framework issue or active dampness behind the frame, we meticulously flag it before sealing over it. For more on what water intrusion at a window frame can mean for your home, see our related post on leaking window frames.
Phase 4: Installing Insect-Impenetrable Closed-Cell Backing Barriers
For any joint wider than about 6mm, we install a high-density closed-cell polyethylene backer rod before applying sealant. This structural foam gives the compound the correct two-point adhesion profile, controls joint depth, and prevents the sealant from bonding to the back of the cavity.
Bugs and wood-boring insects cannot penetrate or burrow through high-density closed-cell foam. Furthermore, it acts as a permanent thermal and air barrier in its own right to stop drafts.
Phase 5: High-Performance Injection of Commercial Pest-Resistant Compounds
We inject commercial-grade, low-modulus architectural sealants, specifically high-movement moisture-cure polyurethanes like Tremco Dymonic 100, chosen for absolute substrate compatibility. These elite industrial polymers cure to a highly dense, flexible rubber skin with a verified Shore A Hardness rating of 40 (tested under ASTM C661 standards).
Unlike cheap retail latex-based builder compounds that turn brittle and crack under solar radiation, this heavy-duty commercial barrier is physically impenetrable, preventing carpenter ants or earwigs from burrowing, chewing, or tunneling through your vertical cladding perimeters
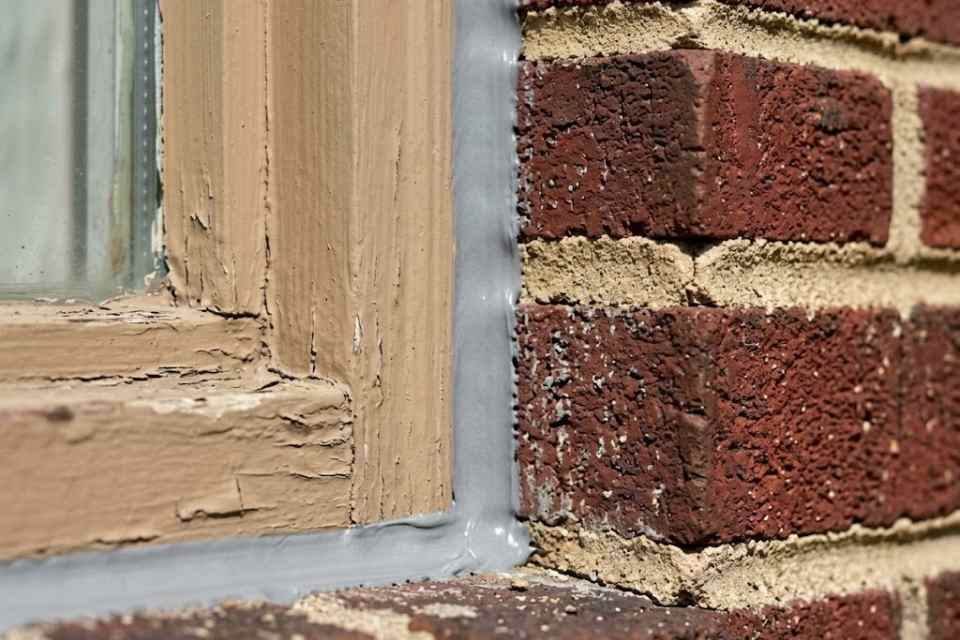
Phase 6: Tooling Smooth Grout-Line Profiles to Eliminate Insect Footholds
The freshly injected sealant is immediately profiled using specialized tooling knives to construct a smooth, concave bead. This detailed tooling forces the wet compound deep into the microscopic pores of your brickwork and casing channels, eliminating hidden air leak paths.
We enforce a strict 2:1 width-to-depth structural ratio over our high-density closed-cell backer rods. This exact geometric calibration ensures the outer anchor shoulders maintain a flawless chemical bond while the center ribbon stretches evenly during extreme thermal shifting.
5 Red Flags That Your Exterior Window Seals Are Letting Bugs In
If you are not sure whether your current window seals are compromised, a quick walk around your home’s exterior will reveal the warning signs. These are the exact physical indicators our team evaluates on every local job site to locate hidden structural entry tracks.
Importantly, these physical failures also signal that your conditioned cool indoor air is actively escaping, driving up your household utility costs right alongside the building pest problem.
As detailed in our comprehensive article on saving on AC bills with proper caulking, a compromised building envelope directly forces your cooling systems to work overtime against uncontrolled ventilation.
Red Flag 1: Visible Stress Cracks and Separation Gaps
Even a hairline fracture running down a weathered joint channel is easily wide enough for an entire colony of foraging worker ants to pass through. If you can physically spot daylight or slide a thin piece of paper into a perimeter gap, insects can navigate that path effortlessly to access your interior framing.
Red Flag 2: Complete Substrate Delamination and Edge Tearing
This specific failure occurs when the old caulk line appears visually present but has completely separated from the window frame or the rough masonry wall face. It creates a hidden, dark void directly behind the surface material that operates as a perfect, unshielded entry tunnel for earwigs and silverfish.
Red Flag 3: Chalky, Crumbly, or Dried-Out Retail Compounds
Healthy commercial architectural sealant must remain firm yet highly flexible through ongoing seasonal temperature fluctuations. If your current window caulk crumbles under light finger pressure or flakes off in dry pieces, it has completely lost its molecular elasticity and its adhesive bond.
Red Flag 4: Facade Discoloration and Damp Sub-Frame Staining
Dark water staining or bubbling paint on the exterior cladding directly below a window sill indicates that moisture is tracking behind a failed seal. This trapped water accelerates internal wall rot while creating the exact damp, rotting organic environment that actively attracts wood-boring pests and carpenter ants.
Red Flag 5: Aged Builder-Grade Installations Exceeding a 10-Year Lifespan
Original builder caulk on older homes has long since exceeded its operational envelope and lost its flexibility under intense solar radiation fatigue. While the old bead may still look somewhat intact from across the driveway, an up-close inspection will reveal that its structural adhesion has completely vanished.
For more background on how carpenter ants and structural insects exploit compromised building entry points, see the Government of Canada’s pest control guidance, which highlights the critical importance of sealing mechanical envelopes to block dynamic environmental moisture and common perimeter pest highways before treating with chemicals.
Stop Sharing Your Home with Summer Pests
You have already spent enough time wiping down windowsills and wondering why the ants keep coming back after every spray treatment. A professional window seal is a one-time structural fix that costs less than a year of recurring exterminator visits and lasts a decade or more.
We serve Burlington and surrounding areas year-round, and summer is exactly the right time to address this before the problem gets worse.
Call Oleg directly for a live response and a straight answer about what your home actually needs. No sales pitch. No service contracts. Just honest work from someone who has been doing this in Burlington for 18 years.
Lock Pests Out of Your Home Permanently
Stop paying for recurring chemical sprays. Get a free, permanent structural window sealing estimate in the Burlington area today.
Proper Caulking – Burlington, Ontario